Lily's Summer Project
Preface
Throughout the summer of 2020, I have been pursuing to expand my knowledge of environmentally sustainable initiatives. I plan to create my own compost pile at home using the "Bokashi" method (see subpage under the "Methods Of Composting" page) and record my results. Originally, I planned to document my progress and bring this knowledge and experience back to campus. This would be to ultimately implement a composting system using the abundance of food scraps produced every day in the dining halls.
Amid the uncertainty of COVID-19, I aim to treat this project as a learning experience and an opportunity to record my successes in growing my own compost pile for the first time. This will allow me to more effectively create change in the near future, be it at school or in my local community.
After receiving a grant at my school for this project, I will be recording my progress over the next few months on this blog. Simultaneously, I will be researching alternative methods of composting. These other methods will be considered depending on the other factors of these potential environmental initiatives (such as available space, tools, and budget.)
DIY Bokashi Bran
Materials
-
EM Powder
-
Most recipies suggest using EM-1 (a type of microbe solution)
-
-
Rice Husks (1 kg should be more than enough for a 45 pound compost pile)
-
Any type of dry, fine and granular material should work.
-
-
Molasses
-
Warm water
-
Large mixing container (see image on the right)
-
Plastic bag (without holes)
-
A mixing tool (I used the end of a clean paint brush)
Different sources will suggest varying amounts of each material, so I decided to approximate the amount for some materials, and follow the labeled instructions for others. For consistently successful results, check out this procedure.

My Personal Compost Pile
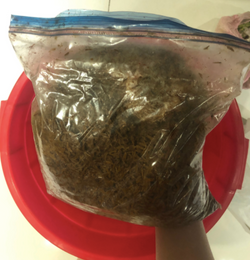
July 14, 2020 (2 weeks after the bran is created)
-
By this stage, the fermentation process is complete
-
The level of moisture is consistent in the Bokashi bran. The bran is not dry or flaky, but also not wet or moldy. It has found a balance in moisture.
-
No sign of black or blue mold (which would indicate an unsuccessful fermentation process)
-
There is some white mold, which is due to the little bits of oxygen reaching the bran. Nevertheless indicates a successful fermentation process.
 |  |  |
|---|

I initially bought a a cheap plastic bucket to drill holes in at the bottom. This unfortunately broke the bucket.
July 15, 2020
-
I bought a better quality plastic bucket. Choosing the "right" plastic bucket is hit-or-miss.
Conclusion: Paint buckets would have been a more reliable choice since they are often made with a more sturdy type of plastic.

Creating a Bokashi Compost Pile
Note: Please hover your mouse over the bottom of each slide to view their captions.


Line the bottom of the top bucket with a cloth. I cut the cloth out into a circle that fit the bucket via tracing the bucket rim.

I stored my Bokashi compost in this bathroom, since it is mainly used for storage. Leave the bucket to ferment for at least two weeks.
July 29, 2020 (Week 2 of fermentation)
-
A thin layer of white mold has appeared on the surface.
-
The yeast-like smell has intensified in the compost pile, but the bucket lid and cloth filter it out. The smell is not overbearing (even in a closed space such as my bathroom.)
-
Due to the challenge of creating a compost pile during COVID-19, I am currently trying to find a place where I can bury this content. Fortunately, many sources say that a Bokashi pile can be left for up to a year (as long as its liquid content is regularly drained.)

Conclusion: Expect a slightly sweet, pickled, and/or almost yeast-like smell from the compost.
August 12, 2020 (Week 4 of fermentation)
-
The white mold seems to has dispersed throughout the compost pile.
-
There is still no black or blue mold in the bucket, which would have indicated that the food scraps decomposed instead of fermented.
-
Although there were no visible insects in the bucket during week 2, there are now groups of fly larvae surrounding the rim & lid of the bucket.
-
This occurs especially during the summer months (especially in warm and moist environments.)
-
-
After doing some research, I have identified them as Black Soldier Fly (BSF) larvae, which are fortunately reported to not be harmful to compost.
-
They are very efficient in breaking down food scraps more rapidly and are reported to not be harmful to the compost
-
They thrive in environments with fermenting food
-
The presence of this larvae comes from flies that have laid their eggs on food scraps before putting them in the sealed bin.
-
Conclusion: To avoid the possibility of insects entering or laying eggs in your compost pile, immediately store food scraps in air-tight containers with lids.


Due to the matched description (fat, yellow or brown larvae), I have identified these insects as BSF larvae.
Burying My Bokashi "Pre-COmpost"
 |  |  |
|---|---|---|
 |  |
Burying Procedure
Uncovering the Bokashi Bucket (week 5)
1. Dig a hole in the soil around three feet long and 8 inches deep using a gardening shovel.

2. Use a scooper-tool (originally used to scoop dog feces) to spread the food scraps along the hole evenly.

3. Rinse the inside of the bucket and dump the water in the hole with the food waste. Mix together the solid and liquid content with the soil. Evenly spread out the contents in the hole. See video below for reference.
This cleans the bucket while also allowing the effective microorganisms (EM) to go into the hole with the pre-composted material.
4. Add some soil back into the hole and cover the food waste using a shovel.


Burying Pre-Compost Into House Plants
I repeated the burying procedure with the houseplants on my balcony with a small portion of Bokashi pre-compost. However, instead of making a trench/hole as I did in the yard, I simply mixed the content in the soil due to the small amount of soil in the pot. For part of the process, I asked my housekeeper to help me with the process while I filmed her pouring the contents in. See the video below for a more detailed visual reference.
1. Scoop the remaining Bokashi (solid) contents from the bucket and mix it into the soil of a plant. Then rinse the bucket with clean water and mix the liquid into the soil as well.

2. Remove the prop-up from the bottom bucket. This liquid drained from the top bucket is called "Bokashi Tea" which can be a great natural fertilizer for plants.


3. Mix the soil below the Bokashi content with the compost to create a more even consistency in the soil. Below are pictures of the liquid sitting on the surface layer of the soil in a pot. This is before I mixed the contents into the soil more thoroughly.

